Untangling AKS, Managed Identity and Key Vault

I collapsed into bed on a recent gloomy November evening feeling mentally exhausted. Hours had been spent reading online help. Perusing blog posts. Watching videos on YouTube. All of that, yet I didn’t seem any closer to solving my problem.
The scenario was at least conceptually simple:
- I am writing a program that needs access to data stored in an Azure Key Vault.
- The code, written in C#, is going to be running in a Linux-based container hosted in a Kubernetes cluster, via Azure Kubernetes Service (AKS).
- I want the code to authenticate to KeyVault using an Azure Managed Identity.
That’s it.
Not complicated.
In fact, this is exactly the kind of scenario Managed Identity is designed for, so one would think that a guide showing exactly how to set this up would be one of the first things that turns up in an online search.
Exasperatingly, that was not my experience. While there is plentiful information out there on configuring Managed Identity for an AKS cluster, nothing I found walked through the complete end-to-end scenario where you start from scratch and end with code in an AKS cluster reading data successfully from Key Vault.
Before finally retiring for the night, I took one last stab at finding an answer: a Twitter search.
I typed into the Twitter search box on my phone: AKS Managed Identity Key Vault
This resulted in one interesting looking result, posted by Azure Support:
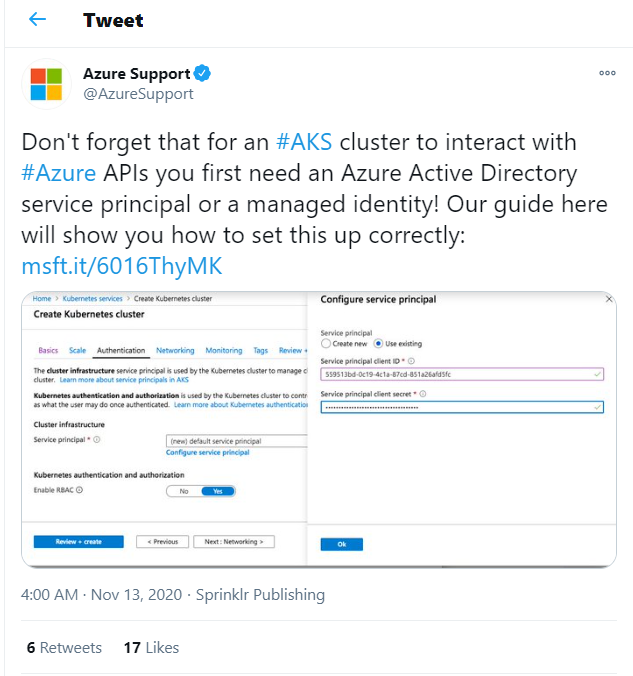
…but when I navigated to their guide, I discovered it has nothing related to configuring Managed Identity! Hopes dashed, I somewhat grumpily replied to their tweet before drifting off to sleep:
Spoiler alert - I did eventually get it working
You can read the Twitter thread, but ultimately the extremely helpful Chad Kittel (@ckittel) came to my rescue and pointed me to a critical step I had been missing.
I had been following something called the Standard Walkthrough on setting up AAD Pod Identity, a critical piece required to get Managed Identity working with an AKS cluster. My mistake was thinking that the instructions in that walkthrough were complete; they were not, and the linked document on Role Assignment, which the walkthrough mentions as a kind of aside, turned out to showcase a critical step. Chad pointed this out and that lead me to a successful solution.
Learning amid overwhelming complexity
Containers, Kubernetes, AKS, Managed Identity. All of this stuff is new to me. A lot of it is rather complex.
How do we tackle learning these systems when they can seem overwhelmingly full of features and settings? Their flexibility and power are amazing, but that comes at a cost of cognitive overload when you are trying to dip your toe into the water and test things out for the first time.
I think Scott Hanselman did a fantastic job discussing this topic in his recent video on understanding the cloud.
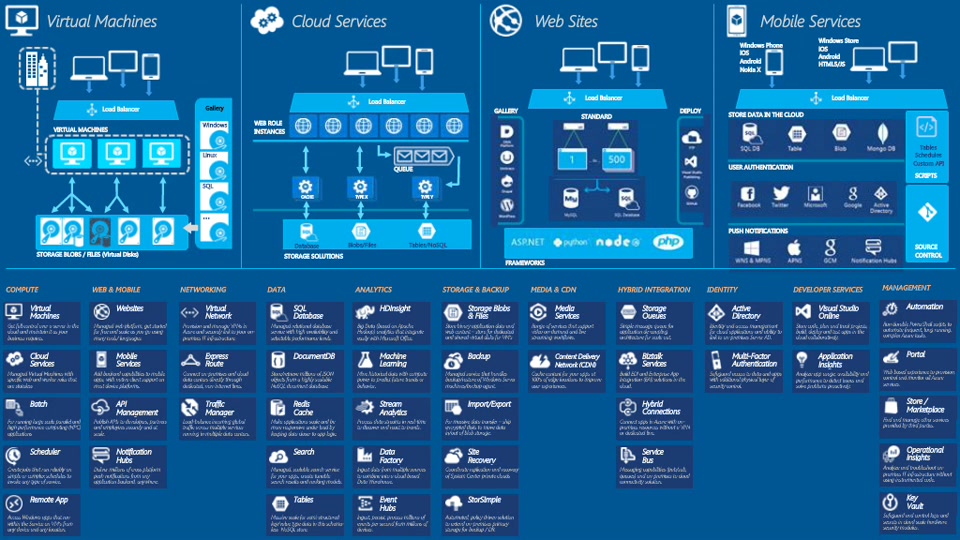
Scott shows a rather hilariously dense poster showing all of the various Azure services and components and, well, overwhelming is a good way to describe it.
This is, incidentally, one of the fundamental tasks of a software developer: managing complexity. What techniques can we employ to keep our sanity?
Scott has some great advice (watch the video!) along the lines of going back to basics and starting simple, building up a deeper understanding from the ground up, piece by piece.
A book that was influential to me when I was first starting my career was The Most Complex Machine. A central theme of that book is complexity and how to deal with it. For someone self-taught who found computers to be unfathomably complicated beasts, it was enlightening to see how the ‘bottoms up’ approach to solving complex problems can be such a critical tool to understanding. The ‘black box’ technique, where we abstract away the internal complexity of an individual component or system by treating it as an opaque box that takes inputs and produces outputs, is extremely useful here. Sometimes we need to crack open the box and see what’s inside, but often we can stay at a level of abstraction where we don’t need to know exactly how it works; we just need to understand how it behaves. Solving complex problems is a matter of starting with simpler pieces and continually going through a process of composition, working upward to build something of greater complexity step-by-step.
The bottom line is that we can avoid being overwhelmed by dividing our overall problem into smaller problems that we can understand and solve individually. The final, more complex working result emerges from composing these solutions together. This is an inherently iterative process: a complete solution does not spring into existence in one fell swoop, but is instead built piece-by-piece, one small solution at a time.
The primer I wished I had found on AKS and Managed Identity
Back to our task: getting code running in AKS to talk successfully to an Azure Key Vault, using Managed Identity.
What follows is going to be the step-by-step walkthrough that I wished I had found when I was trying to get this scenario working.
There are quite a few steps, but we are going to work through them starting from the beginning and build up to a working solution one step at a time.
The need for Managed Identity
First we might ask: why Managed Identity?
A critical scenario for almost all cloud services is that we need a way of dealing with things that are intended to be kept secret. Database passwords. Certificates used for things like TLS. Credentials to talk to 3rd-party services.
Azure provides a great tool to help you keep such secrets hidden and secure: Key Vaults. However, there is an obvious chicken-and-an-egg problem: if you securely store your various secrets in Key Vault, how do you authenticate your service to prove you have permissions to access those secrets? You need…a secret! In order to generate an authentication credential (typically, an access token) you need a password or a private key or something that is itself a secret. Where do you store that?
One common solution to this problem is to have a certificate installed on every virtual machine where your code is going to run, with the private key for that certificate installed as part of a secure, one-time provisioning process for the VM. The certificate can then be set up to be used as a credential for your application that the authentication server will accept in order to grant an access token. Yes, we still have to install the certificate initially on the VM, but it’s a one-time step and after that we can re-use that VM since it will have the necessary credentials to authenticate. If we wave our hands and say that we have a secure way of doing this provisioning, we’ve solved the problem.
Sort of.
The peril of managing secrets
It’s 7:30 AM and I crack an eye open and glance at my phone. My eyes widen.
Eight missed calls from our team in China, who handles operations while our team in the USA sleeps. Three missed calls from my boss. A missed call from my skip-level manager. An instant message conversation where some of our engineers are clearly desparately trying to get ahold of me.
This is not going to be a good morning.
What happened? Our secure credential that our VMs use, which we provisioned a few years ago, just…expired.
One of our services is down, there is a live site incident and because I happened to be the one who provisioned the credential originally, everyone is hoping I can somehow…‘unexpire’ the credential and get things working again. That’s…not how it works.
Certificates and other credentials expiring or being revoked or otherwise becoming invalid is not that uncommon and has to be right up there with somone pushing a bad DNS change with causing cloud service outages.
Managed Identity solves this problem.
What Manged Identity in Azure does is provide a way to associate such an identity with a particular service, yet in a way such that Azure manages the secret (essentially, the password) for that identity. You still have a Service Principal that represents your application, but instead of managing any secrets associated with that principal, Azure does it for you. Managed Identity in essence acts as a wrapper around the Service Principal concept.
In this way, you never need to know the secret for the application and do not have to worry about managing it.
In fact, you never have access to the secret so the possibility of doing something insecure and accidentally leaking it is not even a scenario.
Azure takes care of creating the secret and rotating it periodically. It will never expire underneath you or get revoked or anything else that could suddenly cause your service to no longer be able to prove its identity.
It’s a really great feature…if you can figure out how to set it up.
Setting up Managed Identity in AKS in 30 simple steps
Ok, thirty is kind of a ballpark figure, but there are quite a few steps and they are all individually fairly simple.
We are going to start from scratch. I am going to assume that you have an Azure subscription to use and that it is currently empty.
Prerequisites
We will use the following technologies, so install these in order to follow along:
Kubernetes Note: a separate install is not necessarily required, but you will need to enable Kubernetes in Docker Desktop.
You will want a code editor as well. I use both Visual Studio 2019 and Visual Studio Code (depending on what I’m doing), but neither are required to go through the rest of this guide.
As noted, you will also need an Azure subscription and access to the Azure Portal.
Set the Azure CLI subscription context
Fire up PowerShell in your favorite terminal and let’s get started.
Start by identifying your Subscription ID for the Azure subscription you would like to use. You can identify this by doing the following:
- Run
az loginto log in to Azure. - Execute
az account list | ConvertFrom-Jsonto access your subscriptions. - Take the GUID from the ‘id’ field of the resulting output for the subscripton you would like to use.
cloudName        : AzureCloud
homeTenantId     : 9015d140-0c27-4bd7-b950-cd2ed6d9c3f2
id               : bd947c6a-ac3f-44f1-a679-c6d6568a80c1
isDefault        : True
managedByTenants : {}
name             : Visual Studio Enterprise Subscription
state            : Enabled
tenantId         : 9015d140-0c27-4bd7-b950-cd2ed6d9c3f2
user             : @{name=user@example.com; type=user}
$env:SUBSCRIPTION_ID="<Your Subscription Id>"We will now set our Azure CLI context to use that subscription.
az account set --subscription $env:SUBSCRIPTION_IDCreate a resource group
We will create a resource group for our standard Azure resources, such as Key Vault.
$env:RESOURCE_GROUP="aks-demo"
$env:RESOURCE_LOCATION="westus2"
az group create -g $env:RESOURCE_GROUP --location $env:RESOURCE_LOCATION
Create a Key Vault and add a secret to it
Our scenario is going to attempt to access secrets stored in Key Vault, so let’s create one and add our secret data to it.
$env:KEYVAULT_NAME="$($env:RESOURCE_GROUP)-vault"
az keyvault create -g $env:RESOURCE_GROUP --name $env:KEYVAULT_NAME
az keyvault secret set --vault-name $env:KEYVAULT_NAME --name AksDemoSecret --value "Sensitive data!"
Create an application to read the KeyVault secret
At this point we have a resource group containing a Key Vault and that Key Vault contains a secret we want out application to be able to access.
The goal is to be able to access that secret when our code is running in Kubernetes, in an AKS cluster, without us having to know any secrets up front.
The next step will be to write our application code. This will be a simple .NET 5 application in C# that can access that resource.
Perform the following steps to create a new background worker service project and add the necessary NuGet package references we will need.
dotnet new worker --name SecretFetcher
cd ./SecretFetcher
dotnet add package Microsoft.Extensions.Configuration.AzureKeyVault
dotnet add package Microsoft.Azure.Services.AppAuthentication
dotnet add package Microsoft.Azure.KeyVault
dotnet add package Microsoft.IdentityModel.Clients.ActiveDirectory
Add the name of the key vault we created as a configuration setting, by editing the appsettings.json file and adding an entry for ‘KeyVaultName’:
appsettings.json
{
  "Logging": {
    "LogLevel": {
      "Default": "Information",
      "Microsoft": "Warning",
      "Microsoft.Hosting.Lifetime": "Information"
    }
  },
  "KeyVaultName": "aks-demo-vault"
}
Replace the contents of Program.cs with the following:
Program.cs
namespace SecretFetcher
{
    using System;
    using System.Threading.Tasks;
    using Microsoft.Azure.KeyVault;
    using Microsoft.Azure.Services.AppAuthentication;
    using Microsoft.Extensions.Configuration;
    using Microsoft.Extensions.Configuration.AzureKeyVault;
    using Microsoft.Extensions.DependencyInjection;
    using Microsoft.Extensions.Hosting;

    public class Program
    {
        public static void Main(string[] args)
        {
            try
            {
                Console.WriteLine($"SecretFetcher started at {DateTime.UtcNow} UTC!");
                CreateHostBuilder(args).Build().Run();
            }
            catch (Exception e)
            {
                Console.WriteLine(e);
                throw;
            }
        }

        public static IHostBuilder CreateHostBuilder(string[] args) =>
            Host.CreateDefaultBuilder(args)
                .ConfigureServices((hostContext, services) =>
                {
                    services.AddHostedService<Worker>();
                }).ConfigureAppConfiguration((context, config) =>
                {
                    var configSettings = config.Build();

                    KeyVaultClient kvc;
                    string token = Environment.GetEnvironmentVariable("ACCESS_TOKEN");

                    if (!string.IsNullOrWhiteSpace(token))
                    {
                        // Local development scenario, use an explicit access token from 'az login' instead of using
                        // managed identity.
                        kvc = new KeyVaultClient(async (string _, string _, string _) => await Task.FromResult(token));
                    }
                    else
                    {
                        // Use managed identity.
                        var azureServiceTokenProvider = new AzureServiceTokenProvider();
                        kvc = new KeyVaultClient(
                            new KeyVaultClient.AuthenticationCallback(azureServiceTokenProvider.KeyVaultTokenCallback));
                    }

                    config.AddAzureKeyVault(
                        $"https://{configSettings["KeyVaultName"]}.vault.azure.net/",
                        kvc,
                        new DefaultKeyVaultSecretManager());
                });
    }
}
Note that the code is written to allow either passing an explicit access token in as an environment variable, or relying on managed identity to provide a token automatically via the AzureServiceTokenProvider. The former is to allow running this code in a local docker container, where managed identity is not available since the code is not actually running in Azure.
Replace the contents of Worker.cs with the following:
Worker.cs
namespace SecretFetcher
{
    using Microsoft.Extensions.Configuration;
    using Microsoft.Extensions.Hosting;
    using Microsoft.Extensions.Logging;
    using System;
    using System.Threading;
    using System.Threading.Tasks;

    public class Worker : BackgroundService
    {
        private readonly ILogger<Worker> _logger;
        private readonly IConfiguration _configuration;

        public Worker(
            ILogger<Worker> logger,
            IConfiguration configuration)
        {
            _logger = logger;
            _configuration = configuration;
        }

        protected override async Task ExecuteAsync(CancellationToken stoppingToken)
        {
            while (!stoppingToken.IsCancellationRequested)
            {
                _logger.LogInformation("Worker running at: {time}", DateTimeOffset.Now);
                var secret = _configuration["AksDemoSecret"];
                _logger.LogInformation($"Fetched the following value for 'AksDemoSecret': '{secret}'");
                await Task.Delay(TimeSpan.FromSeconds(10), stoppingToken);
                ((IConfigurationRoot)_configuration).Reload();
            }
        }
    }
}
Note that the KeyVault access is abstracted away in the following line:
var secret = _configuration["AksDemoSecret"];Here we are just looking for the value to come from configuration; because the KeyVault middleware we hooked up in Program.cs is implemented as a configuration provider, it is transparent and seamless to our code that the value is actually returned from KeyVault.
The underlying configuration is refreshed every 10 seconds, so if the secret changes we should be able to access the new value.
We are going to run this code in a Linux container, so build and publish the project for Linux:
dotnet publish -r linux-x64Add a Dockerfile in the same folder as the csproj:
Dockerfile
FROM mcr.microsoft.com/dotnet/runtime:5.0
WORKDIR /app
COPY . .
CMD ["./bin/Debug/net5.0/linux-x64/SecretFetcher"]
Build and run the docker image
docker build --tag secretfetcher:latest .We are going to first run it locally and verify it works, so get an access token we can pass in as an environment variable (again, since managed identity only works when actually running in Azure.)
$env:ACCESS_TOKEN=(az account get-access-token --resource=https://vault.azure.net | ConvertFrom-Json).accessTokenNow we can actually start the container and pass in the access token:
docker run -e ACCESS_TOKEN=$env:ACCESS_TOKEN -it secretfetcher:latestThis should result in some output like the following:
SecretFetcher started at 11/28/2020 23:50:52 UTC!
info: SecretFetcher.Worker[0]
      Worker running at: 11/28/2020 23:50:53 +00:00
info: SecretFetcher.Worker[0]
      Fetched the following value for 'AksDemoSecret': 'Sensitive data!'
info: Microsoft.Hosting.Lifetime[0]
      Application started. Press Ctrl+C to shut down.
Press ctrl+c to terminate the app running in our local container.
We have successfully set up our Azure resources and written a simple program that retrieves a secret from KeyVault when run in a local docker container. Now we will move on to getting it up and running in Azure.
Add support for managed identity
We were able to run the application in a local docker image and successfully access KeyVault, because we passed in an access token generated for our current user account, which we authenticated as via az login at the start of this demo.
When we actually run in Azure, we will use managed identity instead to acquire an access token based on our containerized service being bound to a specific service principal, using a managed identity.
First we create a managed identity:
$env:IDENTITY_NAME="aks-demo-identity"
az identity create -g $env:RESOURCE_GROUP --name $env:IDENTITY_NAME
$env:IDENTITY_CLIENT_ID = az identity show --query clientId -g $env:RESOURCE_GROUP --name $env:IDENTITY_NAME -otsv
$env:IDENTITY_RESOURCE_ID = az identity show --query id -g $env:RESOURCE_GROUP --name $env:IDENTITY_NAME -otsv
$env:IDENTITY_PRINCIPAL_ID = az identity show --query principalId -g $env:RESOURCE_GROUP --name $env:IDENTITY_NAME -otsv
Note that we extracted three identifiers for this identity: the client id, the resource id and the principal id. All three will be needed later on, so we saved them to environment variables for future use.
For Key Vault we will give explicit permissions to the managed identity principal we created.
az keyvault set-policy --secret-permissions get list --name $env:KEYVAULT_NAME --object-id $env:IDENTITY_PRINCIPAL_IDNote that both the get and list permissions are needed for our application to successfully retrieve the secret from Key Vault.
At this point we have created the managed identity that we want our application to use to access our Key Vault. We have granted that managed identity get and list permissions on secrets in that vault. Now we will need to find a way to apply that managed identity to our application when it is running in Azure.
Create a container registry
Since our goal is to run a containerized application in Azure, we will create an Azure Container Registry to push our container images to.
Container registry names need to be globally unique, so for the purposes of this demo we are using a little trick and appending five random characters to the registry name to avoid collisions.
$env:CONTAINER_REGISTRY="demoacr$((New-Guid).Guid.Substring(0, 5))"
az acr create -g $env:RESOURCE_GROUP --name $env:CONTAINER_REGISTRY --sku Basic
az acr login --name $env:CONTAINER_REGISTRY
Push our image to the container registry
We need to push our local image to the container registry we created:
docker build --tag secretfetcher:latest .
docker tag secretfetcher:latest "$($env:CONTAINER_REGISTRY).azurecr.io/secretfetcher:latest"
docker push "$($env:CONTAINER_REGISTRY).azurecr.io/secretfetcher:latest"
Our image is now available to be deployed to Kubernetes.
Kubernetes
Now we will move on to creating and configuring the Azure Kubernetes Service (AKS) cluster we intend to set up for use with managed identity.
The first step is to create the cluster.
$env:CLUSTER_NAME="aks-demo-cluster"
az aks create -g $env:RESOURCE_GROUP --name $env:CLUSTER_NAME --enable-managed-identity --attach-acr $env:CONTAINER_REGISTRY
Note that we enabled managed identity (--enable-managed-identity) and attached our container registry (--attach-acr) as part of this process.
When you create an AKS cluster, the cluster provisioning process will create an additional resource group that the cluster uses for Azure resources that it directly controls. Since one of the main points of Kubernetes is to abstract aways various resources such as virtual machines and networking infrastructure from your applications, it will need to manipulate a variety of Azure resources to achieve that. Those resources will go in this cluster-specific resource group, which will have a name starting with ‘MC_’, followed by the name of the resource group in which you created the AKS cluster, the name of the cluster and the cluster location.
We can compose the name of that group and verify that it exists after running az aks create.
$env:CLUSTER_RESOURCE_GROUP="MC_$($env:RESOURCE_GROUP)_$($env:CLUSTER_NAME)_$($env:RESOURCE_LOCATION)"
az group show --name $env:CLUSTER_RESOURCE_GROUP
Now we will configure kubectl to talk to our cluster:
az aks get-credentials -g $env:RESOURCE_GROUP --name $env:CLUSTER_NAME --overwrite-existingThe two managed identities
We have two managed identities in play at this point. The first is the one that we explicitly created. We granted that identity permission to read secrets from our Key Vault. That managed identity represents our application and is managed by us.
The second managed identity is the identity of the AKS cluster itself, which was created because we specified the --enable-managed-identity switch when we ran az aks create. The managed identity of the cluster can be found by inspecting the identityProfile.kubeletidentity.clientId property of the cluster. Let’s extract that identifier, as we will need it shortly.
$clientIdPath = "identityProfile.kubeletidentity.clientId"
$env:CLUSTER_MANAGED_ID = az aks show -g $env:RESOURCE_GROUP --name $env:CLUSTER_NAME --query $clientIdPath -otsv
We will not be granting the cluster itself access to our Key Vault or any other of our Azure resources, but we will be granting it specific permissions that allow it to assign our first managed identity (the one with KeyVault access) to applications running on hardware it (the cluster) controls.
Role assignments for the AKS cluster
We need to add the ‘Managed Identity Operator’ and ‘Virtual Machine Contributor’ role assignments to the AKS cluster’s managed identity.
Specifically:
- We assign
Virtual Machine Contributoron the resource group in which the AKS nodes actually run (the$env:CLUSTER_RESOURCE_GROUP, or the one that starts with MC_…) - We assign
Managed Identity Operatoron the resource group where the managed identity we want our applications to run as was created.
$scope = "/subscriptions/$env:SUBSCRIPTION_ID/resourcegroups/$env:CLUSTER_RESOURCE_GROUP"
az role assignment create --role "Virtual Machine Contributor" --assignee $env:CLUSTER_MANAGED_ID --scope $scope

$scope = "/subscriptions/$env:SUBSCRIPTION_ID/resourcegroups/$env:RESOURCE_GROUP"
az role assignment create --role "Managed Identity Operator" --assignee $env:CLUSTER_MANAGED_ID --scope $scope
The above role assignments must be completed before moving on to the next step, installing AAD Pod Identity into our cluster.
Note that the above two steps, assigning these specific roles to the AKS cluster, were the critical piece that I was missing when I tried going through the standard walkthrough on setting up managed identity for an AKS cluster.
At this point the AKS cluster has been granted permissions to apply our managed identity (that can access Key Vault) to applications that run within it, and it has the ability to manage the virtual machines that will be used to run those applications.
AAD Pod Identity
In order to make managed identity work, we need to install AAD Pod Identity. We haven’t used Helm yet, but it makes doing so quite trivial, as you will see below.
helm repo add aad-pod-identity https://raw.githubusercontent.com/Azure/aad-pod-identity/master/charts
helm install aad-pod-identity aad-pod-identity/aad-pod-identity --set nmi.allowNetworkPluginKubenet='true'
Note that we had to set the nmi.allowNetworkPluginKubenet value to true. This is because AKS clusters use Kubenet by default and AAD Pod Identity is disabled on Kubenet until you explicitly enable it with this setting. The reason for this is explained on this page.
This was another step that was not clear from the standard walkthrough and was only discoverable by debugging the logs for the AAD Pod Identity containers after they were running in the cluster.
MIC and NMI components of AAD Pod Identity
AAD Pod Identity installs two services into your AKS cluster: the Managed Identity Controller (MIC) and something called Node Managed Identity (NMI). The MIC is responsible for binding managed identities to virtual machines based on the pods running on those machines. The NMI is responsible for intercepting requests to get an auth token by application code. NMI uses the configured managed identity for the application (which we will set up shortly) as the principal for the access token request.
Binding a managed identity to an application using AAD Pod Identity
We need to deploy an identity and identity binding to the cluster. These Kubernetes resources will be used by the MIC to find pods that need to have the specified identity associated with them.
First we define the identity itself, which maps to the managed identity we created earlier and gave access to our Key Vault:
$cmd = "
apiVersion: `"aadpodidentity.k8s.io/v1`"
kind: AzureIdentity
metadata:
  name: $($env:IDENTITY_NAME)
spec:
  type: 0
  resourceID: $($env:IDENTITY_RESOURCE_ID)
  clientID: $($env:IDENTITY_CLIENT_ID)
"

$cmd | kubectl apply -f -
We next create a binding resource, which uses the selector property to find deployments having a specific label. If a deployment has such a label, it’s essentially saying ‘apply the related managed identity to the VM where my pod is running!’
$cmd = "
apiVersion: `"aadpodidentity.k8s.io/v1`"
kind: AzureIdentityBinding
metadata:
  name: $($env:IDENTITY_NAME)-binding
spec:
  azureIdentity: $($env:IDENTITY_NAME)
  selector: $($env:IDENTITY_NAME)
"

$cmd | kubectl apply -f -
When we deploy our application, we need to add the special label that the MIC will use to apply the binding we just created. That label is called aadpodidbinding and is added to the labels in the metadata section of the template in our deployment YAML.
  template:
    metadata:
      labels:
        aadpodidbinding: $($env:IDENTITY_NAME)
        app: secretfetcher
The value of the aadpodidbinding must match that of the selector in the binding we created previously. Note that this value does not have to be the name of the managed identity (although that’s as good a value to use as any), it can be any string value. The important part is that they match.

Let’s create the appropriate YAML for our test application, including the critical aadpodidbinding label, and deploy the application into our AKS cluster.
$cmd = "
apiVersion: apps/v1
kind: Deployment
metadata:
name: secretfetcher
spec:
replicas: 1
selector:
matchLabels:
app: secretfetcher
strategy:
rollingUpdate:
maxSurge: 1
maxUnavailable: 1
minReadySeconds: 5
template:
metadata:
labels:
aadpodidbinding: $($env:IDENTITY_NAME)
app: secretfetcher
spec:
nodeSelector:
beta.kubernetes.io/os: linux
containers:
- name: secretfetcher01
image: $($env:CONTAINER_REGISTRY).azurecr.io/secretfetcher:latest
env:
- name: KEYVAULT_NAME
value: $($env:KEYVAULT_NAME)
resources:
requests:
limits:
memory: 256Mi
securityContext:
capabilities:
drop:
- NET_RAW
"
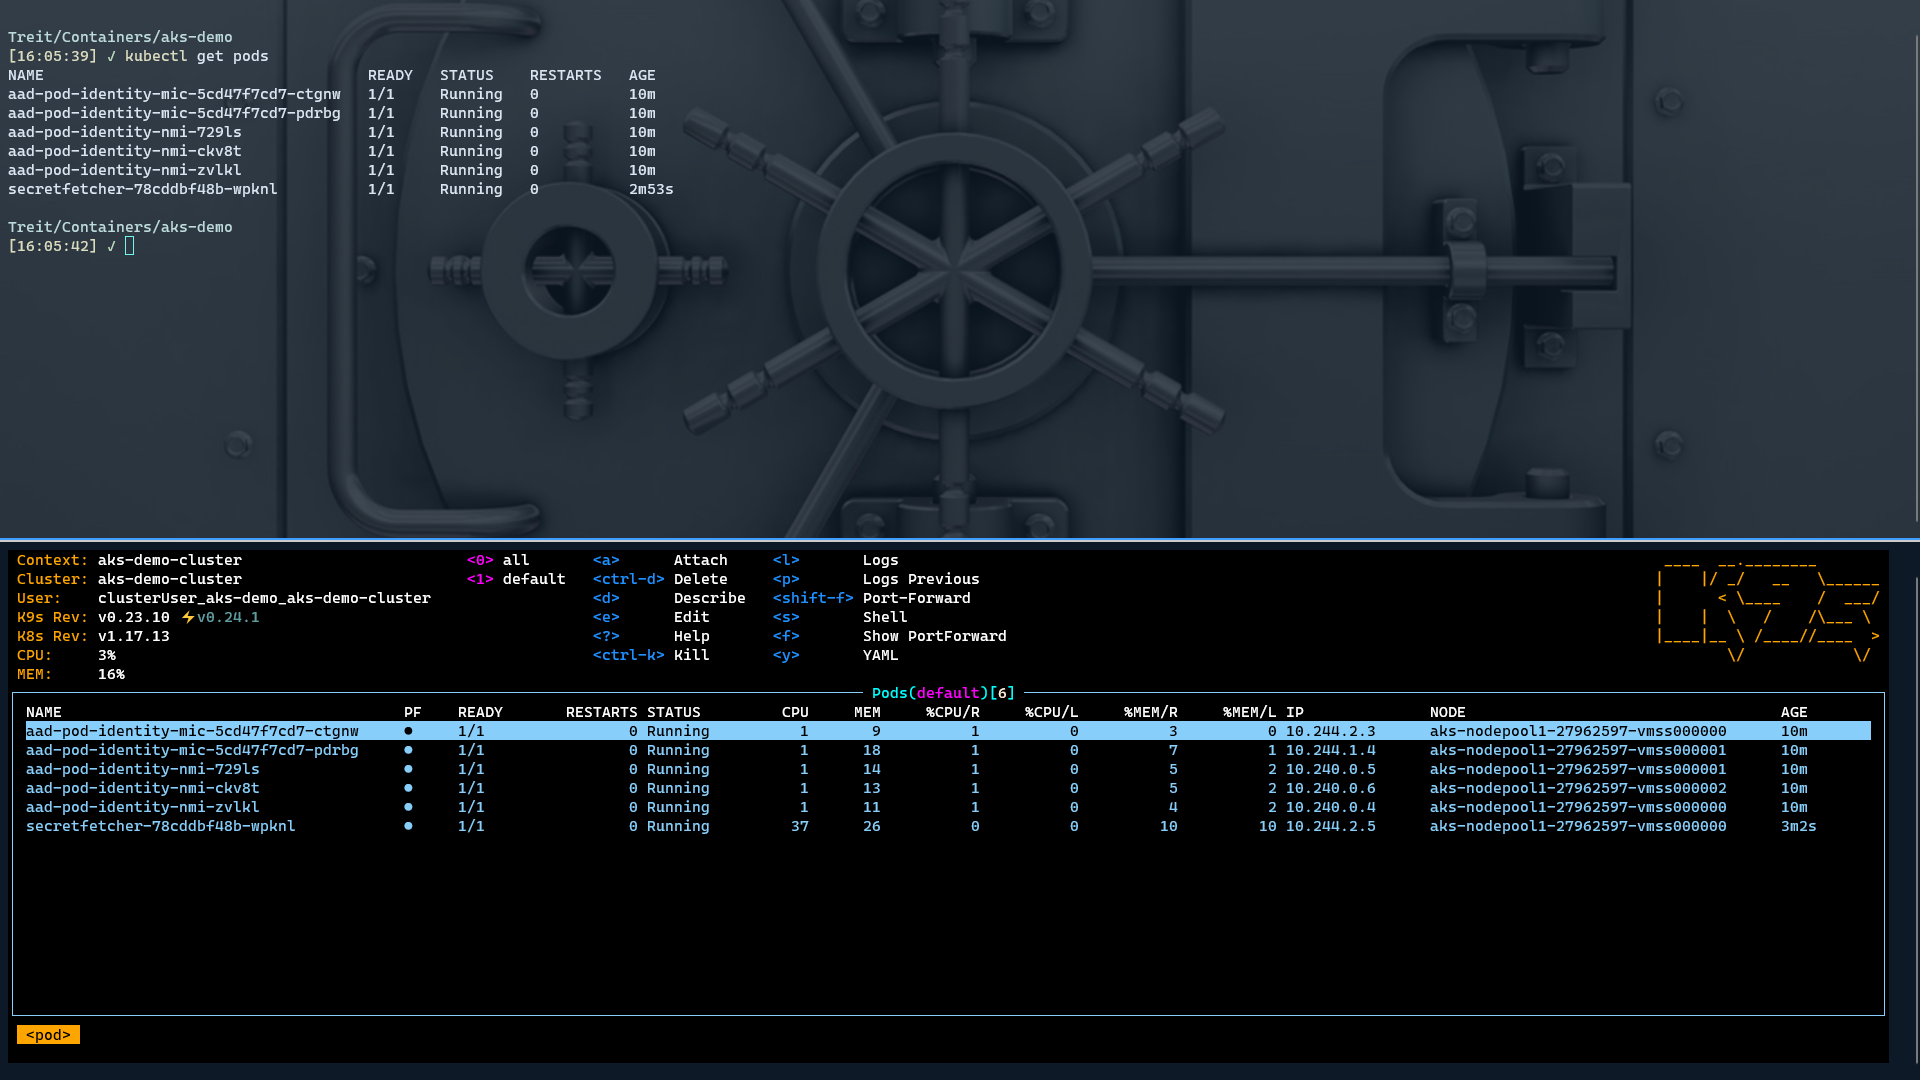
$cmd | kubectl apply -f -At this point we can check which pods are running. We will see the pods created by AAD Pod Identity for both the MIC and NMI services, as well as our own pod for the SecretFetcher application.
Here is one way to get the status of the pods running in our cluster:
kubectl get pods

NAME                                    READY   STATUS    RESTARTS   AGE
aad-pod-identity-mic-5cd47f7cd7-b2wdd   1/1     Running   0          34s
aad-pod-identity-mic-5cd47f7cd7-n52kh   1/1     Running   0          34s
aad-pod-identity-nmi-7sv85              1/1     Running   0          34s
aad-pod-identity-nmi-kx5c6              1/1     Running   0          34s
aad-pod-identity-nmi-wf59l              1/1     Running   0          34s
secretfetcher-67dc7dbd59-fphcb          1/1     Running   2          43s
While we can get this information from kubectl easily enough, I highly recommend using the very useful k9s tool. I run this tool in a separate pane in my terminal so that all changes I make to my cluster can be seen immediately. The tool allows drilling in to individual containers to get logs, spawning a remote shell, killing running pods and so on - all in a simple to use, terminal-based interface.
If everything has been configured properly (and if you followed the steps above carefully, it should be), we can now check our logs and see that we are able to successfully access KeyVault using managed identity:
kubectl logs secretfetcher-67dc7dbd59-fphcb

SecretFetcher started at 11/29/2020 03:03:21 UTC!
info: SecretFetcher.Worker[0]
      Worker running at: 11/29/2020 03:04:14 +00:00
info: SecretFetcher.Worker[0]
      Fetched the following value for 'AksDemoSecret': 'Sensitive Data!'
info: Microsoft.Hosting.Lifetime[0]
      Application started. Press Ctrl+C to shut down.
info: Microsoft.Hosting.Lifetime[0]
      Hosting environment: Production
info: Microsoft.Hosting.Lifetime[0]
      Content root path: /app
info: SecretFetcher.Worker[0]
      Worker running at: 11/29/2020 03:04:24 +00:00
info: SecretFetcher.Worker[0]
      Fetched the following value for 'AksDemoSecret': 'Sensitive Data!'
info: SecretFetcher.Worker[0]
      Worker running at: 11/29/2020 03:04:34 +00:00
info: SecretFetcher.Worker[0]
      Fetched the following value for 'AksDemoSecret': 'Sensitive Data!'
Success! We have started from scratch and properly configured our Azure environment so that we can successfully deploy and run a containerized application in AKS and use Managed Identity to seamlessly connect to our Key Vault.
It might be instructive to see what happens when AAD Pod Identity is not deployed. Let’s stop our existing application:
kubectl scale deployments/secretfetcher --replicas=0…and then uninstall AAD Pod Identity and restart our application:
helm uninstall aad-pod-identity
kubectl scale deployments/secretfetcher --replicas=1
Inspecting the logs for our application should now show that it’s failing miserably.
kubectl logs -l "app=secretfetcher" --tail 100

SecretFetcher started at 11/29/2020 03:23:18 UTC!
Microsoft.Azure.Services.AppAuthentication.AzureServiceTokenProviderException: Parameters: Connection String: [No connection string specified], Resource: https://vault.azure.net, Authority: https://login.windows.net/f57bf9a8-a074-4a10-a754-1b05e4f6e8d9. Exception Message: Tried the following 3 methods to get an access token, but none of them worked.
Parameters: Connection String: [No connection string specified], Resource: https://vault.azure.net, Authority: https://login.windows.net/f57bf9a8-a074-4a10-a754-1b05e4f6e8d9. Exception Message: Tried to get token using Managed Service Identity. Access token could not be acquired. Received a non-retryable error. MSI ResponseCode: BadRequest, Response: {"error":"invalid_request","error_description":"Identity not found"}
Parameters: Connection String: [No connection string specified], Resource: https://vault.azure.net, Authority: https://login.windows.net/f57bf9a8-a074-4a10-a754-1b05e4f6e8d9. Exception Message: Tried to get token using Visual Studio. Access token could not be acquired. Environment variable LOCALAPPDATA not set.
Parameters: Connection String: [No connection string specified], Resource: https://vault.azure.net, Authority: https://login.windows.net/f57bf9a8-a074-4a10-a754-1b05e4f6e8d9. Exception Message: Tried to get token using Azure CLI. Access token could not be acquired.
Re-installing AAD Pod Identity should immediately fix the problem. Note that we don’t need to re-deploy the identity and identity binding resources, as those were never removed from the cluster.
helm install aad-pod-identity aad-pod-identity/aad-pod-identity --set nmi.allowNetworkPluginKubenet='true'If you are running k9s, you should see the application flip from the red ‘failed’ state to successfully running fairly quickly after re-installing AAD Pod Identity.
Cleaning up
We are all done with this walkthrough, so we can clean up all of the resources we created and get back to a clean state in our subscription. This will ensure we don’t pay for resources that we will not be using going forward.
az group delete --resource-group $env:RESOURCE_GROUP --yesNote that we do not need to explicitly delete the resource group used by the AKS cluster for its own resources; deleting the cluster itself will automatically clean that up.
After deleting our resource group, some resources such as our KeyVault instance may be left in a ‘soft deleted’ state.
These can be cleaned up via:
az keyvault purge --name env:KEYVAULT_NAMEConclusion
Moving one step at a time from a clean starting state, we built up all of the necessary infrastructure and pieces to achieve our end goal.
In the end, getting this end-to-end scenario working was not really all that difficult. We simply needed to understand all of the pieces in play and how they fit together. In particular, we needed to understand the importance of assigning the Virtual Machine Contributor and Managed Identity Operator roles to the identity associated with our AKS cluster before installing AAD Pod Identity. We also needed to create the correct identity binding in the cluster so that the components of AAD Pod Identity can apply the correct managed identity to our application.
I certainly learned quite a bit going through this process. I hope you found it instructive too.